كسر الأشياء ليس ممتعًا أبدًا وغالبًا ما يعني التخلص من شيء قبل وقته. قد يكون لديك الكثير من أكواب الشاي المكسورة أو إطارات الصور أو الأثاث أو غيرها من الأدوات المنزلية الشائعة التي تعتقد أنها تنتمي إلى سلة المهملات.
على العكس من ذلك ، هناك العديد من المشاريع المختلفة التي يمكنك القيام بها مع تلك العناصر المكسورة وإنشاء ديكور مذهل للداخل والخارج ، كل ذلك من الأشياء التي قد تعتبرها قمامة. لقد قمنا بتجميع قائمة من 100 مشروع مختلف يستدعي تلك العناصر المكسورة أو القمامة المنزلية الشائعة.
إعادة التخصيص هي طريقة رائعة لإبعاد الأشياء عن مكب النفايات وإعطاء منزلك دفعة صغيرة من الديكور. هذه المشاريع سهلة نسبيًا ، وتستغرق القليل من الوقت والأفضل من ذلك كله ، فهي تسمح لك بإعادة توظيف تلك القمامة بالكامل في شيء مفيد.
احصل على أغراضك المنزلية المكسورة وألقِ نظرة على الطرق المختلفة التي قد تتمكن من إعادتها إلى الحياة. أنت تعرف ماذا يقولون - قمامة فتاة ما هي كنز فتاة أخرى.
قم بتحويل إطار الصورة المكسور إلى حامل القرط
عندما تكسر (أو يكسر أطفالك أو حيواناتك الأليفة) الزجاج من إطار الصورة ، لا تتخلص من القاعدة. بدلاً من ذلك ، استخدمه لإنشاء عرض حلق رائع وعملي للغاية. ستحتاج إلى نوع من الأسلاك (سلك الصورة يعمل جيدًا) لتعليق الأقراط. ما عليك سوى تمرير السلك عبر الإطار ثم تعليق الأقراط. هذه فكرة هدية رائعة للفتيات من جميع الأعمار ويمكنك تشغيل أكبر قدر ممكن من الأسلاك ، مما يجعل العديد من المستويات كما تريد. إذا كان لديك أقراط أطول تتدلى ، اصنع مستويات أطول.
تعليمات DIY وائتمان المشروع - Kevinandamanda

قم بإنشاء مطبخ Play من مركز ترفيهي مكسور
بدلاً من نقل مركز الترفيه القديم هذا إلى مكب النفايات ، خذ بضع ساعات وقم بتحويله إلى مطبخ لعب رائع لطفلك الصغير. ليس من الضروري أن يكون المركز في حالة ممتازة حيث يمكنك تعزيز أي شيء يحتاج إليه ولن يُتوقع حقًا أن يحمل وزنًا كبيرًا على أي حال. مجرد القليل من الطلاء والخيال هو كل ما تحتاجه حقًا لتحويل ذلك القديم إلى شيء ستتمتع به أي فتاة صغيرة لساعات. بالإضافة إلى ذلك ، إنه مكان رائع لتخزين كل ألعاب الطهي التي تلعب.
تعليمات DIY وائتمان المشروع - شبكة DIY

أنشئ مركزًا لإعادة التدوير بسلة قديمة
إذا كانت لديك سلة كبيرة يبدو أنها تتفكك عند اللحامات ، فيمكنك إعادة توظيف تلك السلة في مركز إعادة تدوير رائع. لا تحتاج السلة حقًا إلى الاحتفاظ بأي شيء ، لذا فإن الثقوب الموجودة في الأسفل تكون جيدة تمامًا. يمكنك ببساطة وضع سلال نفايات داخل سلة الخوص لإعادة التدوير ثم تسمية الأقسام حتى تعرف أين يذهب كل شيء. لا يساعدك هذا فقط على استخدام هذه السلة الممزقة للاستخدام الجيد ، بل يمنحك مكانًا جذابًا حقًا لتخزين المواد القابلة لإعادة التدوير.
تعليمات DIY وائتمان المشروع - Bhg

قم بإنشاء شبشب صيفي جديد من القديم
بدلاً من التخلص من تلك النعال عندما تنفصل الأشرطة ولا يمكنك الاحتفاظ بها معًا ، فكر في إنشاء جميع الأحذية الجديدة منها بدلاً من ذلك. مع القليل من القماش ، يمكنك صنع شبشب مضفر رائعتين مثالي لفصل الصيف وسيسمح لك بالاحتفاظ بهذه الأحذية القديمة حتى عندما تبدو وكأنها جاهزة لسلة القمامة. يمكنك حتى صنع الأشرطة المضفرة من القمصان القديمة أو غيرها من الملابس التي بها ثقوب وتحتاج إلى التخلص منها ، لذا فإن هذا هو نتيجة مزدوجة.
تعليمات DIY وائتمان المشروع - Makeit-loveit

حوّل زجاجات غسول الأطفال إلى محطات شحن الهاتف الخلوي
تميل زجاجات غسول الأطفال إلى وضعها في سلة المهملات عندما تكون فارغة. بعد كل شيء ، ماذا يمكنك أن تفعل بهذه الزجاجات الفارغة؟ يمكنك إنشاء محطة شحن هاتف خلوي مفيدة حقًا تمنع الأسلاك الخاصة بك من الخروج في العراء. مع القليل من القماش وبعض القطع وقليل من الوقت ، يمكنك جعل محطة شحن الهاتف الخلوي سهلة الاستخدام هذه والتي تحمل هاتفك والسلك بجوار المكوِّن الإضافي مباشرةً حتى تتمكن من توفير مساحة وسلكك غير مستلقٍ الأرضية (وهي بالمناسبة مكانًا سيئًا لها إذا كان لديك حيوانات أليفة).
تعليمات DIY وائتمان المشروع - Makeit-loveit

اصنع تركيبات الإضاءة من السلال السلكية القديمة
بدلاً من إرسال تلك السلال السلكية القديمة إلى مكب النفايات ، حتى عندما تكون بالية تمامًا ، قم بتحويلها إلى تركيبات إضاءة جذابة حقًا. حتى إذا كانت السلال تحتوي على أسلاك مفكوكة أو بها ثقوب في الأسفل ، يمكنك استخدامها لإنشاء تركيبات الإضاءة المستوحاة من الأنثروبولوجيا والتي ستبدو رائعة في المطبخ. عليك فقط تحضير السلة ثم توصيلها بمصباح قلادة. يمكنك طلاءه مسبقًا ليتناسب مع ديكور مطبخك إذا أردت أو اتركه كما هو.
تعليمات DIY وائتمان المشروع - تصوير أشليان

استخدم الأواني المكسورة كعلامات للحدائق
إذا كان لديك أواني تيرا كوتا أسوأ قليلًا عند ارتدائها ، فلا داعي للتخلص منها. يمكنك استخدامها لصنع علامات حديقة رائعة. هذا حتى إذا كان لديك وعاء واحد مكسور. فقط خذ بضع قطع واكتب أسماء زهورك أو أعشابك أو خضرواتك باستخدام قلم تحديد سحري حتى لا تؤتي ثمارها أو يمكنك أن تكون مبدعًا حقًا وترسم عليها الأسماء (يمكنك إنشاء القليل من الأعمال الفنية عليها أيضًا ). إذا كان لديك العديد من الأواني القديمة غير الصالحة للزراعة ، فاستخدمها لتسمية كل شيء في حديقتك.
تعليمات DIY وائتمان المشروع - ربات البيوت بالكاد

حوّل خزانة الملابس القديمة إلى مقعد مريح
أنا أحب كل شيء عن مشروع تجديد الأثاث هذا! التعليمات بسيطة وإذا كان بإمكانك الحصول على واحدة من هذه الخزائن القديمة بسعر رخيص فهذا مشروع لا بد منه!
تعليمات DIY وائتمان المشروع - تصاميم Grillo

تحويل تيرا كوتا المكسورة إلى القرع
يمكن استخدام مزارع تيرا كوتا القديمة هذه لصنع قرع جميل. يمكنك فعل ذلك بأي عدد من السيراميك ، لذا إذا كان لديك أطباق أو صحون مكسورة ، فاستخدمها أيضًا. كل ما عليك فعله هو صنع قطع صغيرة ثم تجميع شكل يشبه الفسيفساء على كرة من الفوم. هذا أيضًا مشروع رائع لعيد الميلاد ، فقط يمكنك استخدام ألوان العطلة لإنشاء الحلي. من السهل حقًا صنعها وهي تتفوق على رمي المزارع والألواح المكسورة في سلة المهملات.
تعليمات DIY وائتمان المشروع - Craftsncoffee

ابتكر فنًا باستخدام اللوحات المتشققة
بدلاً من التخلص من تلك اللوحات المتشققة على الفور ، لماذا لا تحولها إلى فن يمكنك عرضه على مطبخك أو حائط غرفة الطعام؟ هذا مشروع رائع للألواح التي تم تقسيمها بالفعل إلى قطعتين أو أكثر. ربما لن ترغب في لصقها معًا مرة أخرى إذا تحطمت ولكن إذا كان لديك بضع قطع أكبر ، يمكنك لصقها معًا بهذه الطريقة واستخدامها لتزيين جدرانك. إنه مشروع رائع حقًا للأطباق القديمة الذي لا يمكنك التخلص منه حتى عند كسرها.
تعليمات DIY وائتمان المشروع - Homelife

اصنع حوضًا للطيور باستخدام الغراس والألواح المتشققة
استخدم مزارعي تيرا كوتا المتشققة وتلك الألواح المكسورة أو المتشققة لإنشاء حوض طائر جميل لحديقتك. يمكنك استخدام المزارعون بأحجام مختلفة ، لذا إذا كان لديك العديد منها تالف ، فهذه طريقة رائعة لإعادة توظيفها. عليك فقط أن ترسمها (إذا كنت تريد) لجعلها فريدة بعض الشيء ثم تجميعها. ستحب استخدام تلك الألواح المتشققة والمزارع بشكل أفضل وستحبك الطيور أيضًا.
تعليمات DIY وائتمان المشروع - Patriciaspots

اصنع حقيبة قابلة لإعادة الاستخدام من Broken Umbrellas
عندما ينكسر المعدن الموجود في المظلة ، يحين وقت سلة المهملات عادةً. ومع ذلك ، يمكنك الآن استخدام القماش من تلك المظلة لإنشاء هذه الحقائب الأنيقة القابلة للطي والقابلة لإعادة الاستخدام. هناك القليل من الخياطة ولكن بشكل عام ، من السهل حقًا إنشاء هذه الحقائب الصغيرة ويتم طيها في لفافة حتى تتمكن من حملها معك أينما ذهبت. تعتبر هذه الأشياء رائعة لرحلات التسوق المرتجلة عندما تحتاج إلى حقيبة قابلة لإعادة الاستخدام لحمل الأشياء إلى المنزل. إنها صغيرة جدًا بحيث يمكنك الاحتفاظ بواحد في حقيبتك ولا تعرف أبدًا أنه هناك.
تعليمات DIY وائتمان المشروع - Untrendylife

اصنع الخرز من الزجاجات المكسورة
من المحتمل أن ترمي زجاجة مكسورة بشكل طبيعي. لست مضطرًا لذلك. يمكنك استخدام هذه الطريقة بدلاً من ذلك لإنشاء حبات زجاجية جميلة من تلك الزجاجة. يمكنك بعد ذلك استخدام الخرز لصنع أي عدد من الحرف الأخرى من المجوهرات إلى الأجراس الهوائية أو أي شيء تريده. يرجى ملاحظة أن هذه المركبة يمكن أن تكون خطرة ، لذا يجب عليك دائمًا توخي الحذر وحماية عينيك من شظايا الزجاج. إذا تمكنت من الحصول على تعليق منه ، فلا يوجد حد لما يمكنك إنشاؤه من تلك الزجاجات القديمة.
تعليمات DIY وائتمان المشروع - التعليمات

اصنع مكتبين من طاولة مكسورة
إذا كانت لديك طاولة مطبخ مخدوشة أو مكسورة أو تالفة بطريقة أخرى أو طاولة لم تعد بحاجة إليها حقًا ، فلا تتخلص منها. بدلاً من ذلك ، استخدمه لإنشاء مكتبين رائعين على الحائط من المؤكد أنهما سيحققان نجاحًا في منزلك. أنت لا تحتاج حقًا إلى منتصف الطاولة ، لذا فهو مشروع رائع للجداول التي تضررت حقًا في المنتصف. يمكنك ببساطة قص المقاطع الطرفية أو طلاءها أو تلطيخها ثم لصقها على الحائط.
تعليمات DIY وائتمان المشروع - Migonishome

اصنع أضواء الشاي من أغطية الزجاجات
حسنًا ، لا يتم كسر أغطية الزجاجات حقًا عند التخلص منها ولكن يمكن بالتأكيد إعادة استخدامها على أي حال. يمكنك استخدامها لإنشاء شموع صغيرة رائعة ومثالية عندما تحتاج إلى الكثير من الشموع (فكر في حفلات الزفاف أو المناسبات الكبيرة الأخرى). كل ما عليك فعله هو تنظيف أغطية الزجاجة وإضافة فتيل ثم صب بعض الشمع. يأتي الشمع في الواقع من أقلام التلوين الذائبة ، لذا فهذه درجة مزدوجة. يمكنك الاحتفاظ بأغطية الزجاجات هذه خارج مكب النفايات ولديك شيء يمكنك القيام به مع تلك الطباشير الملون القديمة المكسورة.
تعليمات DIY وائتمان المشروع - Austinweddingblog

اصنع أقلام تلوين جديدة من Broken Ones
بدلًا من رمي تلك الأقلام المكسورة ، اصنع منها أقلام تلوين بألوان قوس قزح. هذا مشروع بسيط وسيعشق الأطفال ألوان قوس قزح هذه تمامًا. أنت بحاجة إلى عدد قليل من علب الصفيح أو زجاجات الوصفات الطبية الفارغة أو تلك العلب البلاستيكية الصغيرة التي يأتي بها الفيلم وبعض أقلام التلوين المكسورة. تقوم بشكل أساسي بإذابة أقلام التلوين في علب الصفيح (تأكد من تنظيفها جيدًا أولاً) ثم تصب في الزجاجات حتى يتم ضبطها. أقلام التلوين هي الحجم المثالي ويمكنك القيام بها بأي عدد تريده من الألوان - اعتمادًا على عدد أقلام التلوين المكسورة لديك.
تعليمات DIY وائتمان المشروع - Momtastic

استخدم الألواح المكسورة للغطاء الأرضي
على الرغم من أنك بالتأكيد لن ترغب في وجود ألواح مكسورة في حديقتك الفعلية ، يمكنك استخدامها بدلاً من الفرش لإعطاء مناطق معينة القليل من اللون. بدلاً من ملء حول أشجارك بالنشارة أو الحصى على سبيل المثال ، استخدم تلك الألواح المكسورة أو أواني التراكوتا. يمكنك صنعها بلون واحد لجعلها تبدو أنيقة حقًا أو امزجها للحصول على مظهر أكثر متعة وإثارة. إنه أرخص بكثير من نشارة وحصى البازلاء وسيمنحك مظهرًا فريدًا حقًا في مناطق حديقتك.
تعليمات DIY وائتمان المشروع - Apartmenttherapy

استخدم اللوحات المكسورة كحافة حديقة
يمكنك استخدام الأطباق والصحون المكسورة كحواف حول مناطق الحدائق والأشجار. إذا كان لديك بعض الخزف الصيني القديم الذي لا يمكنك حقًا أن تنفصل عنه ، فاستخدم هذه اللوحات لإنشاء حدود جميلة لمناطق الحدائق. يمكن كسر الألواح المتشققة أو المتكسرة إلى النصف (بعناية بالطبع) ثم يتم لصق النصفين ببساطة في الأرض. يمكنك استخدام نفس الألوان أو مزجها قليلاً. يساعدك هذا في العناية بهذه اللوحات ويمنحك حوافًا غير مكلفة حقًا ولكنها جميلة للمساحات الخارجية المفضلة لديك.
تعليمات DIY وائتمان المشروع - Wondermom

حوّل كتابًا قديمًا إلى كتاب فني
إذا كانت لديك كتب قديمة (كما تعلم ، الكتب التي تفتقد نصف الصفحات) فلن تضطر إلى التخلص منها. يمكنك في الواقع استخدام كتب غلاف كرتونية قديمة لإنشاء كتاب فني أنيق وعملي حقًا يحتوي على جميع المستلزمات الفنية لطفلك. هذه رائعة للسفر لأنها تشغل مساحة صغيرة بالإضافة إلى أنها تتمتع بمقبض صغير أنيق للغاية لسهولة الحمل. أنت بحاجة إلى القليل من القماش لصنع حاملات لأقلام الرصاص أو أقلام التلوين ثم المقبض وبالطبع المستلزمات الفنية.
تعليمات DIY وائتمان المشروع - Cosmocricket

حوّل الطباشير الملون المكسور إلى تمارين ضغط رائعة
تعتبر أقلام الدفع باهظة الثمن بعض الشيء وقد لا يكون شراء ألوان متعددة في حدود ميزانيتك. ما هي أفضل طريقة للتخلص من أقلام التلوين القديمة المكسورة من القيام بتمارين ضغط أقلام التلوين الخاصة بك؟ يمكنك أيضًا التخلص من حاويات الغراء الفارغة في نفس الوقت. عليك فقط تنظيف أعواد الغراء ثم صب قلم التلوين المذاب فيها. يمكن للأطفال بعد ذلك لف أقلام التلوين لأعلى ولأسفل حسب الحاجة. هذا مشروع رائع للسماح للأطفال بمساعدتك نظرًا لأنه سهل حقًا وليس فوضويًا على الإطلاق.
تعليمات DIY وائتمان المشروع - Infarrantlycreative

تحويل السيراميك المكسور إلى مزارع مصمم
يمكنك استخدام الأطباق المكسورة أو الصحون أو فناجين الشاي أو أي شيء مشابه تقريبًا لإنشاء أواني المزارع الجميلة. أنت فقط تستخدم طريقة الفسيفساء لإرفاق القطع المكسورة بزارع تيرا كوتا بغراء قوي أو بودج. هذه طريقة رائعة لإظهار إبداعك من خلال عمل تصميمات وأنماط أو وضعها هناك كما تريد. ستكون المزارع الخاصة بك فريدة وجميلة ولن تضطر إلى إرسال تلك الأطباق القديمة المكسورة إلى مكب النفايات.
تعليمات DIY وائتمان المشروع - Allfreecrafts

اجعل الأضواء من الكرات الأرضية المكسورة
هل تحطمت الكرة الأرضية عند اللحامات؟ إذا كان لديك ، ولا تريد أو لا يمكنك لصقها معًا مرة أخرى ، فاستخدمها لإنشاء هذه الأضواء الفريدة حقًا بدلاً من ذلك. هذه رائعة لغرف الأطفال أو يمكنك وضعها في المطبخ إذا أردت. فهي وظيفية وتعليمية في نفس الوقت. يمكنك طلاء الأجزاء الداخلية بلون مغاير قبل تركيب الأضواء لجعلها تبرز حقًا أو تترك لونها الطبيعي. في كلتا الحالتين ، من المؤكد أن هذه الأضواء ستثير محادثة.
تعليمات DIY وائتمان المشروع - التعليمات

قم بتحويل الطباشير الملون المكسور والبرطمانات الفارغة إلى شموع ملونة
قد تنتهي عادةً الجرار أو المزهريات الفارغة وبعض أقلام التلوين المكسورة في كومة القمامة ولكن يمكنك دمجها وإنشاء شموع ملونة حقًا. فقط قم بإذابة أقلام التلوين وصبها بالألوان. يمكنك القيام بذلك في أوعية ماسون القديمة للحصول على شمعة ذات مظهر ريفي حقًا أو استخدام أي وعاء زجاجي تخطط للتخلص منه. ستقدم هذه الهدايا الرائعة حقًا إذا كنت ترغب في الجمع بين زوجين في سلة ويستغرق إنشاءها القليل من الوقت.
تعليمات DIY وائتمان المشروع - Notimeforflashcards

تحويل المجوهرات المكسورة إلى قطع جديدة
يمكنك أخذ قطع المجوهرات المكسورة وتجميعها معًا لإنشاء أساور رائعة للإسورة والأصفاد ، ولا يستغرق الأمر وقتًا طويلاً حقًا. فقط خذ مجوهراتك المكسورة وبعض أدوات صنع المجوهرات إذا كان لديك (إذا لم تكن تمتلكها ، فهي غير مكلفة حقًا في متجر الحرف المحلي الخاص بك). يمكنك صنع قطع فريدة ومبتكرة للغاية تتناسب مع أسلوبك أو إنشاء شيء مميز لتقديمه كهدية. ليست هناك حاجة للتخلص من قطع المجوهرات القديمة عند كسرها. فقط اصنع شيئًا جديدًا تمامًا معهم.
تعليمات DIY وائتمان المشروع - Hellohydrangea

إنشاء مغناطيس من المجوهرات المكسورة
خذ الأقراط والقلائد والأساور القديمة المكسورة أو دبابيس واصنع منها مغناطيسات جميلة. عليك فقط لصق الجوهرة بمغناطيس ثم استخدامها للحفاظ على جمال الثلاجة أو لوحات الإعلانات. إذا كانت لديك قطع أكبر ، فيمكنك صنع مغناطيس منها أو تجميع قطع أصغر معًا لإنشاء نمط ثم لصقها بمغناطيس. يعمل الغراء الساخن بشكل جيد للحفاظ على المجوهرات على المغناطيس وستبدو ثلاجتك أنيقة ومذهلة عند ارتدائها بمجوهراتك القديمة المكسورة.
تعليمات DIY وائتمان المشروع - Livelovediy

اصنع مغذيات الطيور من أكواب الشاي المكسورة
إذا كان لديك فنجان شاي مقطوعًا أو مكسورًا وصحنًا تنوي التخلص منه ، اصنع طبقًا لتغذية الطيور معهم. يمكنك صنعها في حوالي ساعة وستحتاج فقط إلى فنجان شاي أو كوب أو صحن أو غراء مقاوم للماء وشيء لتعليق المغذي عليه أو معه. أضف بذرة طائرك وقد نجحت في تحويل هذه القمامة إلى كنز. ستحب طائرك مغذيتهم الجديدة وستحب الأناقة البسيطة لوجود فنجان شاي وصحن جميل في فناء منزلك.
تعليمات DIY وائتمان المشروع - Blogglebeans

تحويل المجوهرات المكسورة إلى الخزانة تسحب
يمكن استخدام الأساور والأقراط والقلائد المكسورة لإنشاء خزانات سحب جميلة للحمام أو المطبخ ، مهما كان ما تفضله. أنت فقط تأخذ تلك المجوهرات المكسورة وتضعها في منشور ملولب. يمكنك التقاط حزم المنشورات الملولبة ذات البراغي من متجر الأجهزة المحلي بحوالي 1 دولار أو نحو ذلك. استخدم غراء الإيبوكسي أو أي شيء قوي مماثل لتثبيت المجوهرات في مكانها. ستعمل قطع المجوهرات الأكبر حجمًا بشكل أفضل أو إذا كان لديك قطع أصغر يمكنك لصقها بقاعدة ثم لصقها بالقاعدة على المنشور.
تعليمات DIY وائتمان المشروع - Threescoopsoflove

اصنع زينة عيد الميلاد باستخدام الأقراص المدمجة المكسورة
عندما تتعرض الأقراص المضغوطة للخدش أو التكسير ، فلن تعمل بشكل صحيح بعد الآن. بدلاً من رميها في سلة المهملات ، استخدمها لإنشاء زخارف كرة ديسكو صغيرة يمكن أن تزين شجرتك في عيد الميلاد القادم. عليك فقط كسر القرص المضغوط (بافتراض أنه لا يزال سليما نسبيًا) ثم استخدام مسدس الغراء الساخن للصق تلك القطع بالزخارف الزجاجية. يمكنك تجربة ذلك باستخدام كرات الستايروفوم أيضًا إذا كنت تريد ولكن الزجاج يعمل بشكل أفضل. يمكنك عمل زجاج شفاف أو زخرفة زخرفية بألوان مختلفة باستخدام القرص المضغوط الفضي لإضفاء مظهر ملون حقًا.
تعليمات DIY وائتمان المشروع - Cremedelacraft

اصنع وعاء عطري من كرة أرضية مكسورة
إذا كان لديك كرة أرضية قديمة مكسورة بطريقة ما ، يمكنك أخذ النصف الأفضل وإنشاء وعاء جميل لعرض الفواحة أو إذا قمت بطلاء الجزء الداخلي ، يمكنك حتى استخدامه كوعاء تقديم غريب الأطوار. ستحتاج إلى لوحة خشبية مستديرة لتلتصق بأسفل الكرة الأرضية من أجل الحفاظ عليها مستوية عندما تكون ممتلئة ولكن يمكنك الحصول عليها من متجر الحرف المحلي الخاص بك مقابل القليل جدًا. أو ، إذا كان لديك قطعة من الخشب الرقائقي ، فقط قم بقص واحدة بنفسك. ثم قم ببساطة بلصق نصف الكرة الأرضية بالقاعدة واحصل على وعاء كبير. إذا كان نصفي الكرة الأرضية في حالة جيدة ، فيمكنك عمل وعاءين.
تعليمات DIY ورصيد المشروع - مخالفات مع سبق الإصرار

إنشاء طاولات ليلية من مكتب مكسور
إذا كان لديك مكتب قديم مكسور أو مهترئ أو تالف ، فلن تحتاج إلى التخلص منه. بدلاً من ذلك ، استخدمه لإنشاء طاولات جانبية مطابقة. حتى لو كان الجزء العلوي غير قابل للإصلاح تمامًا ، يمكنك صنع طاولات جانبية من المكتب ثم صقلها ورسمها لتتناسب مع ديكور غرفة نومك الحالية. يعمل هذا بشكل أفضل مع المكاتب التي تحتوي على نفس عدد الأدراج على كل جانب أو يمكنك فقط إنشاء حامل واحد خارج المكتب إذا كنت تريد ذلك أو إذا لم يكن به أدراج متطابقة على كل جانب.
تعليمات DIY وائتمان المشروع - Sugarbeecrafts

قم بإنشاء مقعد على الطراز الفرنسي من الكراسي المكسورة
بدلاً من رمي كراسي تناول الطعام القديمة المكسورة ، اصطحبها واصنع مقعدًا مذهلاً مستوحى من الطراز الفرنسي. هذا واحد من أكثر المشاريع أناقة للأثاث المكسور وواحد من أسهلها أيضًا. ستحتاج إلى كرسيين من نفس الطراز وستحتاج إلى إنشاء "صندوق" خشبي لمقعد المقعد. ثم قم بطلائها بأي لون تريده (الأبيض يجعلها تبدو أنيقة للغاية) وأضف وسادة خفيفة. هذا مقعد رائع لسرير السرير أو مدخل أو في أي مكان آخر في منزلك ويمكنك صنعه مقابل لا شيء تقريبًا (مقارنة بشراء واحد بمئات الدولارات).
تعليمات DIY وائتمان المشروع - Anoregoncottage

اصنع شماعات باردة من الكراسي المكسورة
يمكن استخدام ظهور الكراسي المكسورة لإنشاء علاقات فريدة ورائعة للغاية. عليك ببساطة إزالة ظهورهم (أو التقاطهم إذا كان الكرسي قد انهار تمامًا) ثم إضافة جهاز الحظيرة. على الرغم من أنك ربما لن ترغب في صنع الكثير من هذه الأشياء لملء خزانتك ، إلا أنها تمنحك شيئًا ما لتفعله بتلك الكراسي المكسورة التي تكون مفيدة وتساعدك على إبعاد تلك القمامة عن مكب النفايات. بالإضافة إلى أنها غريبة الأطوار بما يكفي لتقديم هدايا رائعة.
تعليمات DIY وائتمان المشروع - Likecool

تحويل الكراسي المكسورة إلى أراجيح الحديقة
الكرسي الذي فقد ساقيه هو عديم الفائدة تمامًا في غرفة الطعام ولكنه يمكن أن يكون مثاليًا للعشب - عندما تجعله يتأرجح. يمكنك أخذ الكراسي القديمة ورسمها ببساطة وإضافة بعض الأجهزة وتعليقها من الشرفة أو من شجرة كبيرة في الفناء الخاص بك. هذه فكرة رائعة لأي شخص لديه عدد قليل من كراسي تناول الطعام التي يفكرون في التخلص منها لأن الأرجل ليست قوية. ما عليك سوى تحويلهم جميعًا إلى أرجوحات ، ورسمها بألوان زاهية مختلفة وتزيين حديقتك بها.
تعليمات DIY وائتمان المشروع - Thisdiylife

قم بتحويل الدراجة المكسورة إلى وعاء وحامل مقلاة
لست بحاجة إلى الدراجة بأكملها لهذا المشروع ، فقط العجلة. عجلات الدراجات هي الحجم المثالي لتعليق الأواني والمقالي ولأنها مستديرة ، يمكنك إنشاء رف من نوع القرص الدوار منها حتى يسهل الوصول إلى الأواني والمقالي. كل ما عليك فعله هو توصيل الأجهزة المعلقة بالعجلة بحيث يمكنك تثبيتها بالسقف. ثم أضف الخطافات للأواني والمقالي. هذا يستفيد بشكل جيد من الدراجات المكسورة ويمنحك القليل من التنظيم في المطبخ.
تعليمات DIY وائتمان المشروع - التعليمات

اصنع سريرًا متحركًا من الدراجات المكسورة
هذا ليس صعبًا كما يبدو. لا يمكنك تعليق الدراجات في الواقع ولكن يمكنك إنشاء حركة رائعة بعجلة دراجة مكسورة. تعتبر الدائرة في الواقع مثالية للشكل كما أن المتحدث الموجود على العجلة رائع لتعليق الأشياء. ستكون هذه أيضًا فكرة رائعة لمشاريع النظام الشمسي عندما يتعين عليك تعليق الكواكب والشمس والقمر في تسلسل. يسمح الشكل المستدير للجوال بالدوران بسهولة ويمكنك إضافة أي شيء تريده لجذب انتباه طفلك الصغير. يمكنك حتى وضع صندوق موسيقى عليه إذا أردت.
تعليمات DIY وائتمان المشروع - Numinationavenue

اصنع حفرة نار من غسالة مكسورة
لا تحتاج في الواقع إلى الغسالة بأكملها لهذا المشروع - فقط الحلة الداخلية. يمكنك بناء حفرة حريق كبيرة للفناء الخلفي وحفظ جزء من تلك الغسالة من أن ينتهي بها المطاف في مكب النفايات في نفس الوقت. سوف تحتاج إلى استخدام طلاء عالي الحرارة وهناك القليل من العمل المطلوب ، ولكن ليس بالقدر الذي قد تعتقده. تمنحك أسطوانة الغسالة الشكل المثالي بحيث تكون حفرة النار لديك مثالية ومن السهل حقًا إنشاؤها. فقط تخيل المتعة التي ستحصل عليها من الجلوس بجانب النار في الليالي الباردة وستوفر القليل من القمامة أثناء قيامك بذلك.
تعليمات DIY وائتمان المشروع - Apartmenttherapy

تحويل خزانة الملابس المكسورة إلى الرفوف
إذا كان لديك خزانة ملابس مكسورة ، يمكنك استخدام الأدراج لصنع أرفف خرائط رائعة. هذا أمر رائع إذا كان لديك خزانة ملابس تقوم بتحويلها إلى شيء آخر ولا تحتاج حقًا إلى كل الأدراج. يمكنك إضافة خريطة إلى أسفل الدرج ثم تعليقها بشكل متدفق على الحائط لإنشاء رف من نوع shadowbox يحتوي على مقتنيات صغيرة. يعد هذا مشروعًا سهلاً ولا يتطلب أن يكون الدرج في حالة ممتازة ، لذا حتى لو كان الجزء السفلي يتساقط ، يمكنك إنشاء هذه الأرفف بدلاً من رمي الخزانة القديمة في سلة المهملات.
تعليمات DIY وائتمان المشروع - Olivebites

تحويل السلالم المكسورة إلى أرفف الكتب
السلالم المكسورة بالتأكيد ليست شيئًا تريد الاستمرار في استخدامه. إذا كان لديك سلم خشبي قديم لم يعد آمنًا للاستخدام ، فلا تتخلص منه على الفور. بدلاً من ذلك ، افصلها واستخدم القسمين كأرفف كتب متطابقة. يمكنك إنشاء مظهر ريفي رائع باستخدام أقسام السلم القديمة تلك وتعليقها على الحائط أو مجرد وضعها على الحائط (على افتراض أنك ستثبتها بالطبع). ستحتوي كل درجة سلم على كتب أو مقتنيات أو أي شيء آخر تحتاجه هناك.
تعليمات DIY وائتمان المشروع - بالكاد مقاسة

قم بتحويل حلة الغسالة المكسورة إلى طاولة القهوة
إذا كنت تحب المظهر الصناعي أو كنت ترغب فقط في الحصول على طاولة قهوة ممتعة وفريدة من نوعها ، فقم بإخراج الحلة من الغسالة المكسورة وتحويلها إلى طاولة. يمكنك تغطية الجزء العلوي بقطعة دائرية من الزجاج (سترغب في قطعها) ثم استخدام الجزء الداخلي لتخزين الأشياء أو إنشاء تأثير ظل مربع صغير. الاحتمالات لهذا واحد لا حصر لها. يمكنك أيضًا استخدام سطح خشبي إذا كنت تفضل أو تركب إضاءة بالداخل حتى تساعد طاولة القهوة في إضاءة غرفة المعيشة.
تعليمات DIY وائتمان المشروع - التعليمات

اقلب الحقيبة المكسورة إلى طاولة
من غير المحتمل أن تفيدك الحقيبة المكسورة (القديمة الثقيلة) ما لم تأخذ الوقت الكافي لتحويلها إلى شيء مفيد حقًا. بإضافة أرجل إلى حقيبة السفر ، يمكنك إنشاء طاولة رائعة مثالية لغرفة المعيشة أو قاعدة السرير. يمكنك تخزين الأشياء داخل حقيبة السفر ، لذا فهي رائعة للحفاظ على تنظيم الغرفة والحصول على مظهر كلاسيكي أنيق حقًا ، وهو مثالي لأولئك الذين يحبون هذا النوع من الديكور.
تعليمات DIY وائتمان المشروع - Designsponge

أعد توظيف البيانو المكسور في طاولة العمل
هل لديك بيانو قديم لم يعد يعمل؟ إذا كنت تفكر في إرسالها إلى مكب النفايات ، فلا تفعل ذلك. يمكنك استخدامه لإنشاء القليل من التخزين والتنظيم بدلاً من ذلك. يعد البيانو القديم المستقيم الحجم والشكل المثاليين لمنضدة عمل مخفية. سيتعين عليك إزالة بعض الأجهزة من داخل البيانو لإفساح المجال للأدوات وما إلى ذلك ، لكن هذا رائع للجراجات أو ورش العمل وأقل تكلفة بكثير من الخروج وشراء مقعد. بالإضافة إلى ذلك ، يعمل مقعد البيانو بشكل رائع لتخزين الكتب والمجلات.
تعليمات DIY وائتمان المشروع - Core77

تحويل الحقائب القديمة المكسورة إلى أسرة الحيوانات الأليفة
يمكن أن تكون القمامة الخاصة بك في الواقع كنز حيوانك الأليف. إذا كان لديك حقيبة قديمة قديمة مكسورة ، يمكنك جعل كلبك الصغير أو قطتك سريرًا رائعًا من تلك الحقيبة. عليك فقط إزالة الجزء العلوي (بحيث لا يغلق على طفلك الصغير) ثم إضافة حشو السرير. يمكنك أيضًا إضافة أرجل ، وإذا كان لديك أكثر من حيوان أليف يحتاج إلى سرير ، فاستخدم الجزء العلوي والسفلي لصنع سريرين. إنه مشروع أنيق حقًا وسهل للغاية ومن المؤكد أنه سيرضي حيواناتك الأليفة وسيمنحك بعضًا من الديكور العتيق الإضافي أيضًا.
تعليمات DIY وائتمان المشروع - إبداعي بشكل عشوائي

قم بتحويل حلة الغسالة إلى مقعد أنيق
أخرجي الحلة من الغسالة المكسورة ، أضيفي بعض الحشو ولديك مقعد صغير مثالي. يمكنك أيضًا إضافة أرجل العجلات المتدحرجة إليها لمنحها شيئًا مميزًا. يمكنك ملء المركز بالحشو أو التفكير في إنشاء قمة من نوع ما لتغطية فتحة الأسطوانة الكبيرة في المركز. أضيفي مقعد الحشو فوقه واجعليه قابلاً للإزالة حتى يمكنك استخدام الجزء الداخلي للتخزين. هذا عظيم للاطفال يمكنك الاحتفاظ بدفاتر التلوين أو الألعاب الأخرى بالداخل ويمكنهم الجلوس عليها أثناء اللعب.
تعليمات DIY وائتمان المشروع - Espritcabane

تحويل حوض الاستحمام المكسور هذا إلى أريكة
هل حقا؟ أريكة من حوض استحمام قدم مخلب قديم؟ إطلاقا. هذا أكثر تعقيدًا قليلاً من بعض مشاريع إعادة الاستخدام ، لكن الأمر يستحق العناء لإنشاء هذه الأريكة الجميلة والأنيقة من حوض سيراميك قديم أو من الحديد. ما عليك سوى قطع الجزء الأمامي لإفساح المجال للأريكة وإضافة الحشو ثم الطلاء إذا أردت. إذا كان لديك حوض استحمام قديم تفكر في التخلص منه ، فحاول بدلاً من ذلك إنشاء هذه الأريكة المذهلة. يمكنك استخدامه في غرفة النوم أو غرفة المعيشة أو في أي مكان تريد فيه القليل من المقاعد الإضافية.
تعليمات DIY وائتمان المشروع - Greenmoxie

تحويل الأواني الفضية المكسورة إلى علامات النبات
لا يجب رمي تلك الملاعق والشوك القديمة المثنية أو المكسورة. بدلاً من ذلك ، فكر في تحويلها إلى علامات نبات مختومة يدويًا. هذا مشروع أنيق حقًا لا يلغي فقط تلك الأدوات الفضية القديمة ، بل يمنحك منطقة حديقة أصلية وريفية المظهر حقًا. تعمل هذه العملية السهلة في الواقع على ختم الأسماء في المعدن بحيث يبدو أنه قد تم إنشاء علامات مخصصة بينما في الواقع ، يمكنك إنشاؤها بنفسك من الأواني الفضية التي كانت جاهزة في سلة المهملات.
تعليمات DIY وائتمان المشروع - Mossymossy

اصنع حامل تلفزيون جميل من خزانة مكسورة
بدلًا من إلقاء خزانة ملابس قديمة عندما لا تعمل الأدراج بشكل صحيح ، قم بتحويلها إلى حامل تلفزيون أنيق. يمكنك إخراج الأدراج الثلاثة العلوية واستخدام الأدراج الأخرى لتخزين الأفلام أو الأقراص المضغوطة أو ملحقات نظام الألعاب. مع القليل من الصنفرة والطلاء وبضع ساعات ، يمكنك إنشاء مركز ترفيهي يبدو أنك دفعت ثروة ، ولكنه في الواقع يكلفك بضعة دولارات فقط. يمكنك أيضًا القيام بذلك لغرف النوم واستخدام الأدراج المتبقية كأدراج خزانة إذا أردت.
تعليمات DIY وائتمان المشروع - Domesticsupero

تحويل شاشة الكمبيوتر المكسورة إلى حوض السمك
يتطلب هذا القليل من العمل ولكنه يستحق ذلك تمامًا ، خاصة إذا كنت شخصًا يستمتع حقًا بالتكنولوجيا. يمكنك تفريغ هذه الشاشة وإنشاء حوض أسماك رائع منها بدلاً من إرسالها إلى مكب النفايات. سيعشق الأطفال الأسماك تمامًا في شاشة الكمبيوتر وهي صغيرة نسبيًا (اعتمادًا على حجم الشاشة) لذا فهي تشغل مساحة صغيرة جدًا. لاحظ أن هذا مخصص للشاشات من النوع الأقدم. لا يمكنك فعل هذا مع شاشة مسطحة.
تعليمات DIY وائتمان المشروع - التعليمات

تحويل العمود القائم المكسور إلى بار أنيق
هذا البيانو القديم المستقيم الذي لم يعد يعزف لحنًا لا يجب أن يتمزقه ويلقي به بعيدًا. يمكنك أن تصنع منه بارًا جميلًا من المؤكد أنه سيكون ضربًا لجميع حفلات الكوكتيل الخاصة بك. ستحتاج إلى إخراج أجزاء التشغيل الفعلية ثم طلاء أو تلطيخ البيانو بأي لون تريده. يمكن تحويل الجزء السفلي من المفاتيح إلى حامل كأس نبيذ رائع والمرآة الموجودة في الخلف تجعله أكثر أناقة. يا لها من طريقة رائعة للإشادة بهذا البيانو القديم!
تعليمات DIY وائتمان المشروع - Househoneys

اصنع رفًا من ذلك الجيتار المكسور
إذا كان لديك جيتار لا يمكن ضبطه بعد الآن أو تم كسره بطريقة ما ، فحوله إلى رف أنيق حقًا. سوف تحتاج إلى إزالة الجزء الأمامي من الجيتار (نأمل دون التسبب في المزيد من الضرر للظهر والرقبة) ثم ببساطة إضافة الرفوف بالداخل. علق هذا على الحائط في غرفة محبي الموسيقى أو احتفظ به في غرفة المعيشة لينال إعجاب الجميع. يعد هذا مكانًا رائعًا لتخزين الأقراص المضغوطة وأدوات الموسيقى الأخرى أو يمكنك استخدامه كرف كتب للموسيقى الورقية.
تعليمات DIY وائتمان المشروع - Diybudgetgirl

استخدم Stemware المكسورة لإضفاء الأناقة على النباتات
بدلاً من التخلص من تلك الجذعية المكسورة ، استخدمها لإضاءة النباتات. عندما يتم كسر سيقان الجذعية ، فإنها تتناسب بشكل جيد مع النباتات المحفوظة في أصيص. ما عليك سوى لصقها داخل الأوساخ بجوار النبات وإضافة شمعة صغيرة إلى الجزء الزجاجي الفعلي. هذا مشروع رائع لا يستغرق سوى ثوانٍ ويمكن استخدامه للنباتات الداخلية والخارجية. احرص على عدم جرح نفسك بالزجاج. This works with any glass that has a stem for the base.
DIY Instructions and Project Credit – Dumpaday

Turn A Broken Refrigerator Into An Outdoor Ice Chest
If your fridge is broken and you’ve had to replace it, you may think that hauling the old one to the dump is the next step. Instead, turn that broken fridge into a great outdoor ice chest. You have to be sure to remove everything that causes the fridge to run (or did before it broke). Then just cover it with wood (cedar works really well) and create an ice chest that is perfect for your outdoor kitchen or deck. You can use the racks and baskets from the fridge for holding items inside the chest.
DIY Instructions and Project Credit – Reddit

Make A Kitchen Utensil Holder From A Broken Rake
When the handle breaks on your rake, don’t automatically trash it. You can use the rake part to create a really neat and rustic looking holder for kitchen utensils. You just have to clean the rake top up a bit to remove any rust and you may want to think about sanding and painting it if it’s really rusty. Then just hang it on the wall and stick your spoons and ladles on it. This is also a great project for holding tools in the garage or tool shed and you don’t really have to clean it up for that.
DIY Instructions and Project Credit – Community

Create A Basket From Broken Blinds
Broken mini blinds normally find their way to the trash can. After all, what could you possibly do with them other than throwing them away? You could actually use them to make a very neat little basket that takes very little time. You just use a weaving method to create the basket and remember to staple together as you go along so that the basket is sturdy. If you have pets that tend to tear up your mini blinds, use them to make baskets instead of tossing them. These baskets are perfect for holding office supplies or just about anything else you can think of.
DIY Instructions and Project Credit – Stephagruss

Make A Wineglass Holder From A Broken Rake
Keep the top of that old rake when it breaks and create a rustic wineglass holder. The sections of the rake top are perfect for holding stemmed glassware and it gives you a great country look. You can simply sand away any rust that may be on the rake and hang it in its natural form or you can paint it with spray paint if you need it to be a specific color to match your kitchen or dining room décor. This is a great project for those old rakes that have broken handles but the tops are still in good condition.
DIY Instructions and Project Credit – Tatteredstyle

Create A Beautiful Chair From Broken China
Instead of throwing out that china when it’s broken, use it to create a stunningly beautiful mosaic chair. This chair is relatively easy to make considering how complicated it looks and it’s a great way to preserve old china that you may simply not want to get rid of even when it’s broken. You just take the broken pieces and put them together on an old chair base in whatever pattern you want. You can use larger pieces or create a smaller mosaic pattern if you have smaller broken pieces.
DIY Instructions and Project Credit – Dishfunctionaldesigns

Build Picture Frames From Broken Mini Blinds
Old mini blinds that are no longer fit to hang aren’t necessarily trash. You can take those blinds and create picture frames in a number of sizes and colors. No matter what material your blinds are made of, you can make beautiful frames for your favorite pictures that are unique and will help you to save money on buying frames for those prints. You just have to measure the pictures that you want to frame so that you have an idea of how many pieces of the blind you need. Then just stack and staple the pieces together to create your frame.
DIY Instructions and Project Credit – Domesticimperfection

Use Chipped Teacups As Curtain Tiebacks
Instead of throwing out those decorative teacups or putting them in the back of a cabinet, use them to create elegant Victorian looking curtain tiebacks. You will need to cut a hole in the bottom for the curtain to come through and then screw a cup hanger into the window frame so that the handle of the cup can be hung. This is a beautiful look and is perfect for formal dining rooms, especially near the china cabinet where you have other dishes in the same pattern sitting.
DIY Instructions and Project Credit – Bhg

Make A Kindle Cozy From Torn Jeans
If you have old dishes that have seen better days, you can use them to create beautiful lighting for your kitchen or breakfast nook. You need cups and saucers in the same pattern or you could use different patterns and make it really unique and interesting. You will need to attach the lighting and this is better done on a wooden plank so that you can keep all of the cups and saucers straight and even. This is a neat project though and one that really won’t take you long.
DIY Instructions and Project Credit – Punkprojects

Make Lighting From Chipped Cups and Saucers
If you have old dishes that have seen better days, you can use them to create beautiful lighting for your kitchen or breakfast nook. This is a neat project though and one that really won’t take you long.
DIY Instructions and Project Credit – Apartmenttherapy

Turn Broken Shutters Into Garden Holders
A broken shutter and some mason jars give you the perfect materials to create a little mini garden for the home or yard. You just have to clean up the shutter, paint if you want and then add the mason jars which are held in place with hot glue. If you are planning to add heavier plants, use clamps. You can cover them up with twine or ribbon. This is great for a kitchen herb garden and keeps you from having to haul those old shutters off to the dump.
DIY Instructions and Project Credit – Sheknows

Use Broken Records To Make Bookends
Have some old vinyl records that are scratched beyond repair? You can use those records to make really cool bookends, which are perfect for teenager’s bedrooms or family rooms for the musically inclined. There is a really easy method that will allow you to bend the bottom of the records so that they sit flat on a surface. Then you just have to add your books. This is also a great way to organize those records or CDs that you have lying around. Just create the bookends from torn or scratched records and use them to keep good ones in place.
DIY Instructions and Project Credit – Homesessive

Create A Bulletin Board From Broken Mattress Springs
If you have smaller mattress springs (think baby bed mattresses or twin beds) you can use those springs to make really useful bulletin boards. This is actually a really neat project that you can customize however you want. Add a mirror, some shelves or just whatever else you want and then just sit the springs up against the wall near your desk. You can also hang it on the wall with some sturdy hardware which is great if you don’t really have floor space available.
DIY Instructions and Project Credit – Funkyjunkinteriors

Turn A Broken Door Into A Shelf
After you replace that broken door and before you throw out the old one, consider turning it into a glorious shelf. You can add fabric, batting and even lighting to create a wonderfully unique shelf that is as functional as it is lovely. The door can stand in the corner or up against a wall or you could add hardware to it for hanging. Older doors give you a great rustic look and you can add as many shelves as you need. Plus, the lights help to illuminate your favorite books or collectibles.
DIY Instructions and Project Credit – Bulbtoblossom

Make A Pot Rack From A Screen Door
If you have a broken screen door and you are considering replacing it, keep the old one. You can use that door to make a very roomy and very attractive pot rack for your pots and pans. Just repaint or re-stain the door and then use chains to hang it from the ceiling. You can add hooks to the screen part for hanging pots and pans and keep lids or other items on top so you get loads of organization and all from that broken screen door that you were planning to throw away.
DIY Instructions and Project Credit – Thekitchn

Turn A Broken Suitcase Into A Medicine Cabinet
Forget throwing that old vintage suitcase away. Even when it’s broken, that suitcase can be used to create a great looking and fully functional medicine cabinet. Just clean out the inside, add some small shelves and you have the makings of a beautiful vintage medicine cabinet that will bring to mind those old traveling medicine men. Add screws to the back to hang it on the wall and if you don’t really need to close the door, you can attach it to the wall open and add shelves on both sides.
DIY Instructions and Project Credit – House-capades

Make Shelves From Torn Books
If you have a few hardcover books that are missing pages or otherwise no longer being read, you can turn them into literal bookshelves. These are really neat and require very little work. In fact, you just have to hang a shelf bracket and then slide the book in. You can create an entire wall of these “book” shelves in just a few minutes and they are great for the bedroom of your favorite bookworm. They also work well in hallways to hold knick-knacks or just anywhere you need them.
DIY Instructions and Project Credit – Realsimple

Turn A Broken Door Into A Coatrack
Take that old broken door, add a few coat hooks and perhaps some mirrored pieces and you have a beautiful coatrack that is perfect for your entryway or mud room. You can do this with even a small piece of a broken door and then just stain or paint it whatever color you need to match your existing décor. If you have an entire door, you could add shelving or create cubbies to hold shoes and other items in the mud room. This is a great repurpose idea for old doors and for organization as well.
DIY Instructions and Project Credit – Prettyhandygirl

Create Napkins From Torn Denim
If your closet is filled with torn jeans that you are tempted to throw away, think about making a few denim napkins first. You can create beautiful napkins with minimal sewing and these are great for summer cookouts. You basically just fold and sew the denim and you can create pockets for holding silverware. This is an easy project and one that you can work on with different materials so whether you have old jeans in the closet or any other clothing that is ripped or stained, you can make napkins from any of it.
DIY Instructions and Project Credit – Yourpocketstylist

Make A New Aquarium From That Broken Old TV
If you have an old console television that no longer works – or a smaller TV for that matter – you can use the base to create a beautiful new aquarium. You will need to be very careful when removing the electronic pieces of the television and when installing the glass and other aquarium parts. This is a great weekend project and if you do have a console television, you will end up with a great aquarium that sits on the floor. The top of the TV is turned into a lift-off lid so you can feed your fish and tend to the aquarium parts as they need serviced.
DIY Instructions and Project Credit – Apartmenttherapy

Make Mirrors From Broken Rackets
Instead of trashing those tennis rackets when the insides come loose, turn them into sporty mirrors. You simply have to remove the netting from inside the racket and then add a mirror to fit that space. You may need to take the measurements (or the entire racket if it’s easier) to a glass cutter to get a mirror shape that will fit perfectly. Then just attach the mirrors to the rackets and hang them in your little tennis player’s bedroom or anywhere in the house.
DIY Instructions and Project Credit – Countryliving

Make A Garden Trellis From Broken Tennis Rackets
When you have several tennis rackets that are no longer fit for use (or you could use badminton rackets for this as well) you can turn them into a really nice looking trellis for the garden. This is great for homes with tennis players and it gives you something to do with those rackets instead of simply throwing them away. You just have to gather and group your rackets together, prepare a frame for them and then assemble it. You can paint them all the same color or go with different colors if you want something a bit bolder.
DIY Instructions and Project Credit – Apartmenttherapy

Turn Broken Drums Into Lights
If you have a drummer in the family and you happen to have a broken drum set, you can make gorgeous drum lights. These are great for the bedroom of your rock star or you could use them in a family room or rec room, whatever you prefer. They are relatively easy to make and can be easily hung from the ceiling. The drums work perfectly as lights and are a great touch if you are looking for something a bit out of the norm for your lighting. Plus, it keeps you from adding those drums to your local landfill.
DIY Instructions and Project Credit – Makelyhome

Create Stuffed Animals From Turn Gloves
If your gloves tend to only last one season before they rip or tear, you can make them last a bit longer by turning them into adorable stuffed animals. This is a great project to begin for the Christmas season as these little cuties make wonderful gifts for all the kids on your list. This is also a good project if your gloves have the fingertips missing because you will remove them anyway. You will have to do a bit of hand sewing but the project is really easy overall.
DIY Instructions and Project Credit – Boredpanda

Make Chainmail From Pop Tabs
Okay, so you would probably be throwing out those pop tabs with the cans, right? If you want, you can use those tabs to create a fabulous chainmail purse. It takes a little preparation and cutting to get the tabs ready but once you are done with that, you can simply put them together and create any number of chainmail items. You can do anything from a purse to a costume to picture frames or just about anything else that you can think of to create from your homemade chainmail.
تعليمات DIY وائتمان المشروع - التعليمات

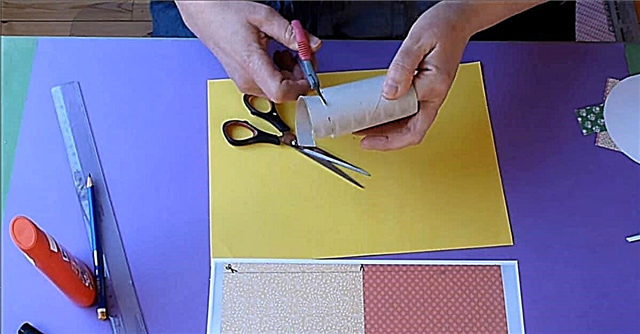
Turn Toilet Paper Rolls Into Art
Okay, so they’re not technically broken but empty toilet paper rolls belong in the trash, right? Well, maybe not. You can actually use them to create stunning wall art so if you tend to like recycling, this is the perfect project for you. You can do this in any number of designs and the paint can be in any color that you need. No one but you will know that your elegant art actually began life as a cardboard toilet paper roll and you can help to minimize your trash by not having as many rolls to throw out every week.
DIY Instructions and Project Credit – Cutoutandkeep

Make Birdhouse Stands From Broken Ladders
When your old wooden ladders are no longer safe for you to stand on, you can turn them into beautiful stands for your birdhouses. This works with ladders of all sizes. If they are wooden, just paint them or leave them as they are if you want something a bit aged and rustic looking. You simply have to sit the birdhouses on top of them and you may want to attach them with a screw to keep them secure. You could have these sitting all over your garden area.
DIY Instructions and Project Credit – Hometalk

Turn A Broken Bed Into A Bench
An old headboard and footboard can be used to make a wonderful corner bench for the little ones. You just have to attach the two together, create the actual seat and then paint or stain the color that you want. Add a cushion and your little ones will adore sitting here to eat or play. You could use this in the dining room or put it outside on the deck if you need extra seating out there. It’s an easy project and a great way to use up those old parts from your broken beds.
DIY Instructions and Project Credit – Myrepurposedlife

Make A Beautiful Bench From That Broken Dresser
This is a great project for dressers that have several broken drawers. While you may want a couple of the drawers to work properly for use on the bottom, the rest of the dresser is basically removed to create the bench. You can then use the bench at the foot of your bed or even on a deck if you need additional outdoor seating. Paint or stain any color and create something that perfectly matches your existing furniture. This is an easy project that will take you less than a day to complete and keeps you from throwing out that broken dresser.
DIY Instructions and Project Credit – Prakticideas

Create Stunning Jewelry From Broken Clothespins
If you have had your clothespins for long, you may notice that the wood has begun to chip or pull completely apart from the spring. Go ahead and pick up new clothespins but save those old broken ones to create stunning jewelry. This is such an easy project and one that doesn’t require any special tools. Plus, it’s a great gift idea that is not only cheap but allows you to use up those springs instead of tossing them out. You can create pendants, earrings or even charm bracelets with them.
DIY Instructions and Project Credit – Michlinla

Create Pedestal Picture Frames From Broken Materials
Take those broken or mismatched candlesticks and those picture frames that no longer hang or sit upright and create elegant pedestal frames that are perfect for gift giving or keeping all to yourself. Just spray paint the frames and candlesticks the same colors and then glue them together once the paint has dried. These are so very easy to make and are perfect for older frames that no longer want to sit where they should. Plus, you can use those candlesticks that you don’t have any other use for.
DIY Instructions and Project Credit – Fancyfrugallife

Create Storage From Torn Books
While you may balk at the thought of tearing up your old books, if you have any that are already torn then this is a great project. You simply hollow out those hold books and use them to store your belongings. You leave the outside intact so when you add them to your bookshelves, they look like real books. You can use them to store items safely out of view and they are really easy to make. You can do one at a time or create a little nook with several book covers.
DIY Instructions and Project Credit – Sewingbarefoot

Use A Broken Door To Make A Crafting Table
A broken door that you can’t really use on your home any longer is perfect for creating a colorful crafting table that your little ones will love. You just use the door as the top and then place it on cube organizers which work to hold all of your little ones’ craft supplies. Actually, if you made it tall enough this would even work as an adult’s crafting table so it just depends on what you need. You can cover the door with fabric or just paint it the color that you want.
DIY Instructions and Project Credit – Marthastewart

Make A Lamp From A Broken Shovel
Have a broken shovel that you are planning to throw away? Before you do, take a look at this wonderful shovel lamp. It’s really easy to make and this is perfect for lighting up the pathway outside your garden area. Imagine the pattern that you could create if you had several of these. You could also use them for added lighting in the garage or in a workshop or just put them right there in the kitchen. You can spray paint your shovel whatever color you need so it’s easy to match the lamp to your existing décor.
DIY Instructions and Project Credit – Project-re

Create A Sporty Bag From A Torn Basketball
Basketballs don’t stay up forever. In fact, cheaper ones will begin losing air rather quickly and depending on the size of the hole in them, you may not be able to air them up again. When that time comes, you don’t have to toss them. You can make a fashionable and really cute bag from them that is perfect for any girl who is into sports. Note that you can do this with a volleyball or football as well so this is a great gift idea for your little cheerleader or a sports mom who is really supportive of her players.
DIY Instructions and Project Credit – Project-re

Turn A Torn Shower Curtain Into A Play Mat
When your shower curtain liner gets a hole or when the tops tear and you can’t keep it on the hooks any longer, you can turn it into a wonderful play mat that your children will adore. You can let the kids create roads and cityscapes for their toy cars or use dry erase markers and let them color their favorite pictures over and over again. Dry erase will wipe easily from the plastic liner so this is a great way to keep the kids busy and give them loads of creativity at the same time.
DIY Instructions and Project Credit – Filthwizardry

Keep Buttons From Torn Clothing for Jewelry
When you have a shirt or sweater that is torn or permanently stained, take a minute to remove the buttons before trashing the clothing. You can use those buttons to create beautiful button bracelets that are fun and would make the perfect inexpensive gift for someone special. You just cut a piece of elastic in the size you need, sew the ends together rather tightly and then sew on the buttons. You can create any number of designs and patterns and each bracelet can be completely unique.
DIY Instructions and Project Credit – Lillyella

Use Broken Dishes And Silverware To Make Wind Chimes
Have some broken china that you can’t bring yourself to part with? Or, perhaps you have some vintage silverware that can no longer be used for eating but you just hate to throw it out. Use those pieces to make beautiful wind chimes that you can hang from your porch. This lets you keep those dishes that you don’t really want to throw away and they make a beautiful sound when the wind blows. You could also use broken costume jewelry as accents if you have any on hand so this is a great project for using up a lot of your broken household items.
DIY Instructions and Project Credit – Songbirdblog

Turn A Broken Chandelier Into A Serving Tray
A broken chandelier (one that no longer works as opposed to one that is actually broken into pieces) makes a beautiful dessert tray. You will need to remove all of the hardware for the lighting from the base and each individual light. Then simply attach china plates to the places where the lights used to hand and use those plates for serving up your favorite desserts. This is a great project for upcoming weddings or is perfect for the Holidays when you want an elegant dessert tray. Broken costume jewelry like faux pearl strands are great for embellishing the tray.
DIY Instructions and Project Credit – Dreaming-n-color

Make Rag Rugs From Torn Clothing
Those old t-shirts that are no longer wearable and just about any other clothing that you may have that is ripped or torn can be used to make wonderful rag rugs. This is also a great project for torn sheets and even curtains in certain fabrics. You can use different clothing materials and colors to create a multi-colored rug or use sheets and old blankets in the same colors for something a bit more elegant. These rugs are perfect for the kitchen in front of the sink or you could use them in the bathroom as bath mats.
DIY Instructions and Project Credit – Littlehouseliving

Use Knobs From Broken Doors For Patio Flooring
Before you throw those old doorknobs away, even if the doors are completely useless, you can turn the knobs into beautiful flooring for your outdoor patio. Actually, you can also use those old burners from your stovetop that no longer work and other items around the house that are broken or otherwise trashcan bound. The different finishes will give your patio a great look and the pieces are very stable when you set them in soil and surround them with your favorite outdoor plants.
DIY Instructions and Project Credit – Sunset

Turn Doorknobs Into Wine Corks
When your doors are broken and in need of repair, keep the doorknobs and use them to create these beautiful and very unique wine corks. All you need are the decorative doorknobs and some cork, which you can buy at any craft or hardware store. You could also just use the cork that comes in your wine bottles if you wanted. This works best with old knobs that have screws in them or you could use old cabinet pulls if they are decorative enough. You simply have to push the screw into the cork by turning and get ready because this could take a bit of time. The end result however, is well worth the effort.
DIY Instructions and Project Credit – Brokegirlsguide

Empty Tin Cans Make Great Hairbrush Holders
While tins cans aren’t really broken, they are useless once you get the food out, right? Instead of adding them to your trash heap, use those cans to make wonderful holders for your hairbrushes. You just have to remove both ends of the cans, clean them very well with warm soapy water and then cover them with Washi tape, paint, wallpaper or just about anything else you want. Fabric works very well and hot glue does a good job of holding your cover in place. Then attach them with screws to the inside of your vanity door and you have a great place for storing and organizing brushes.
DIY Instructions and Project Credit – Thecreativeimperative

Turn Broken Picture Frames Into Decorative Molding
If you love the look of picture frame molding but aren’t really a fan of the cost, you can make your own with those old broken picture frames. If you have frames that have lost their backing or their glass has been broken, you just remove all of that, paint them the color that you want your molding to be and then hang them on the wall. You can use frames that are all the same size or create a pattern from frames of different sizes. This is a great look and one that seems expensive. Only you will know that you have salvaged trash to create it.
DIY Instructions and Project Credit – Bobvila

Make A Jewelry Holder From Broken Spindles
When stair spindles are broken, they may seem useless. You can however, repurpose them into gorgeous jewelry holders that are unique and very creative. You just have to paint them, add a base and then use them to keep your necklaces and bracelets from getting tangled. If you are looking for a unique gift idea and one that won’t cost a fortune, this is a good one. The best part is you make it from something that you were probably just going to throw away. You could also use an old drawer pull or broken costume jewelry to decorate it.
DIY Instructions and Project Credit – Sublime-living

Use Bent and Broken Silverware For Drawer Pulls
Instead of throwing out that old silverware when it bends or breaks, use it to make cabinet door handles instead. This is actually a really popular look and one that may cost a bit if you went out and bought all of those handles. Instead, you can make your own with silverware that you were planning to toss. If you have silverware that is tarnished beyond repair, simply clean it up a bit and paint it if you want to create rustic looking handles that look much more expensive than they are.
DIY Instructions and Project Credit – Whiteleycreek

Make Good Use Of A Broken Binder
When binders break, they are normally trash. After all, they’re really not that expensive and most people simply throw them out without considering what could be done with them. If you cut away the actual cover part, you can use the binder as a key holder. Just attach it to any wall with screws, which will fit nicely into the holes already in it, and then use it to hold keys or put it outside on the deck to hold grilling utensils, towels by the pool or anything else you need. You can paint it if you want or even mount a few of these onto a wooden base.
DIY Instructions and Project Credit – Upcycleus

Create A Stunning Table From A Broken Piano
There really isn’t a lot that you can do with an old piano when it stops working. You can however, create beautiful shadowbox type tables and depending on the size of your piano, you may be able to make two of these for the living room. You use the keys on the inside of the table to give it a really neat musical look and then cover with glass that you can have cut at your local hardware store or glass cutter. These are beautiful and help to somewhat preserve the look of the piano so you don’t really have to throw it all away. You can keep the best parts.
DIY Instructions and Project Credit – Trash2treasure

Turn Leaky Buckets Into Outdoor Serving Items
Those old leaky buckets are useless when it comes to holding liquid but they will serve as holders for your outdoor eating very nicely. You just take some time to give the bucket whatever look you want and then use it for holding silverware, napkins or other solid items when you eat out. Give it a great patriotic look and use it for your 4th of July table outside. It doesn’t take very long to create something great out of an otherwise useless bucket.
DIY Instructions and Project Credit – Hometalk

Make Soap Dispensers From Glass Bottles
If you tend to buy things in glass bottles (like certain bottled waters or wines for instance), you don’t have to necessarily chuck the bottles when they are empty. You can use them to make soap dispensers that are gorgeous and really functional. You will need to get some pumps which you can buy at a craft store or you could just preserve the pump from lotions if you want. Then just clean up and even decorate the bottles with broken jewelry, mosaics made from broken china or anything you want and fill with your favorite liquid soaps.
DIY Instructions and Project Credit – Theredchairblog

Make Coasters From Old Wine Corks
Instead of throwing out the corks when you are finished with the wine, use them to create great coasters. This is a great project for corks that no longer serve their purpose because they don’t need to be in perfect shape to make coasters. The coasters have a great beach-y look to them and they are easy to put together. You need a hot glue gun to attach them to each other and then just tie them off with ribbon or twine, whatever your preference. These are absolutely adorable and such a wonderful way to reuse those old corks.
DIY Instructions and Project Credit – Thefrugalnavywife

Make Monsters From Bread Clips
Once the bread is gone, you normally throw out the clips, right? Some people do use them for other things and if you are one of those people, this is a great Halloween project for you. You can turn those clips into adorable monsters that you hang on DIY garland to decorate for the holiday. Just paint monster faces on your bread clips and this works with clips of all sizes, even the ones that may be broken or chipped. Once you have your monster faces done, just clip them all onto a rope or string for hanging.
DIY Instructions and Project Credit – Craftyladylindsay

Create Berry Basket Snowflakes
Okay, so normally you would throw out those plastic berry baskets, especially if they’re broken. Before you do however, take a look at the beautiful snowflakes that you can create with them. This works well even with baskets that are broken or ripped. You really just need the bottom of the basket and it’s ok if the bottom is a bit worse for wear as well. Just create the snowflake shape and then glue and dip in glitter. These are great for hanging outdoors for the Holidays or you could even use them to decorate the tree.
DIY Instructions and Project Credit – Alphamom